Prepare quality artwork for upload

Adding a low quality image to a print file will leave you with a product that looks blurred or pixelated and an unhappy customer. Here are a few tips for getting the best result with your print file.
Spoiler – It’s all about the size – so lets start at the beginning…

1... Start with creating your artwork to give yourself the most print-on-demand product flexibility
Your original artwork (the awesome stuff you spend hours, days or weeks creating) needs to be as big as possible.
If it is created digitally in something like Photoshop, start with a large artboard – if you think the largest product you might want to sell will be a 40x40inch canvas then start with that or work in a vector format using a programme like Illustrator.
If your artwork is created in the real world, make sure when you digitise it (convert it to a digital file) you photograph/scan your artwork at the highest resolution available and ensure the image isn’t compressed on saving - you can always save smaller sizes from the original scan.
Remember it’s easy to make an image size smaller, but not bigger.
Always keep a full size master file!
 It’s a great plan to leave yourself plenty of ‘bleed’, this is extra space around the main part of your image where background detail or colour runs into. Some products require a print file much larger than the immediately obvious area to ensure that once the item is finished there are no white areas. So, if you would like your image to gallery wrap around the edges of a canvas, or the pattern to run underneath your tote bag without over enlarging the main area of the image then create big margins/extend your background around your piece.

2... Choose your product and get the size and resolution right
Making sure your print file has large enough dimensions and a high enough resolution (or dpi) for the product is essential to get good printing results. At Artovo we recommend at least 150dpi at 100% for canvas, cushions, aprons and large bags and 300dpi for the smaller products like mugs, coasters and passport covers. You can find out which printing method a product has in the description along with minimum dimension sizes.
Your artwork needs to be a bit larger than the final size of the product and at either 150dpi or 300dpi depending on the product. So for example on an 18” cushion you’d be looking at designing something around 20” x 20” (50cm x 50cm) at 150DPI.
Remember: Enlarging your artwork decreases the resolution.
 DPI stands for Dots Per Inch, so the higher the dpi the sharper the print – but much more than 300dpi doesn’t actually improve print quality on material.
If your file seems unusually massive double check you are setting Dots Per Inch, not Dots Per Centimetre!

3... Save the right format
When resizing your artwork files for print, NEVER save over your original! Always work from a copy of your original artwork to avoid accidentally overwriting your work!
When saving your print file, the Artovo system will only accept a JPEG file in an sRGB colour mode (most files are this colour profile automatically).
If you try to submit an image with a different format it will most likely fail in import or it can cause errors in our system which could result in your image being distorted, washed out or not coming through to us at all.
Use our handy templates that you can find on the product pages to size your artwork correctly. Then save your file in sRGB colour format as a JPEG ready to upload.
Saving & File Sizes:
Depending on the detail in your artwork your final files might be a bit too large for our uploader. If you come across this, The following steps are a useful work around to reduce your file size while making no noticeable difference to the finished product.
Working in Photoshop: Once you are happy with your artwork, rather than using the standard SAVE methods, choose FILE/EXPORT/EXPORT AS….
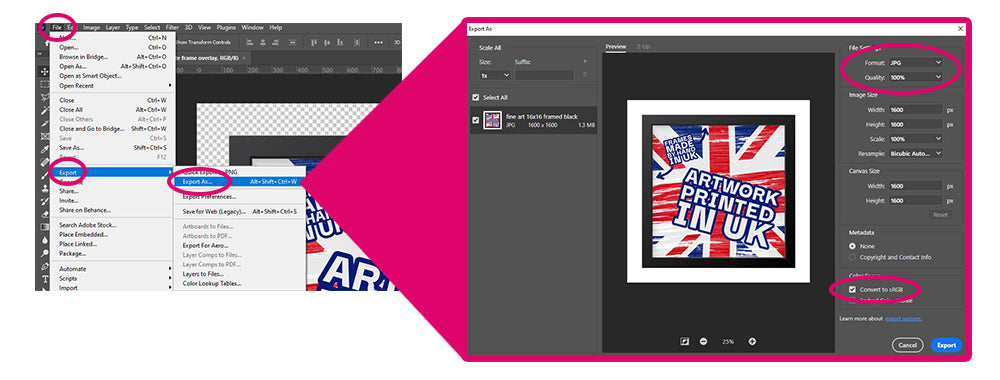
When the export window opens, choose JPG as the Format, then change the quality from Excellent to Great, or from 100% to 85-90% You will be shown the file size on left.
Colour Management - Remember: Screens can lie!
If on screen you are using the extremes of the colour chart like the brightest of greens or an intense turquoise, the printed version might not quite match it – not because of the print quality but because the colour you see on screen is made from light – all those little pixels are electricity glowing in your face, ink doesn’t quite have the same kick!

If you are working on your artwork using Adobe software (Photoshop/Illustrator) there is a handy icon in the ‘color pallet’ to show you when a colour may not print as it looks on screen.

4... Adding artwork to the product generator
Make sure any original artwork you drop onto the templates doesn’t have to be significantly enlarged. As an artist the last thing you want is your creation blurred, squashed, stretched or cropped.

Luckily Artovo has built in a nifty little feature that will alert you if the resolution is too low.
Thank you for taking the time to read our guide, keep an eye out for future helpful tips and tricks. We hope this helps with your artwork development and gives you some great printing results with Artovo in the future.